This recipe includes canning your applesauce. Please before you attempt to can, refer to a trusted source. I referred to Bernardin’s website- they are a trusted company that sells canning supplies and recipes, etc. I also referred to the website simplycanning.ca, I found them to be a bit more accessible than the Bernardin website; I also felt the Bernardin website was constantly trying to sell their products at every step of the process.
I used 5 McIntosh Apples to get 2 pints, but you can use as much as you want and can use any type of apple, given your taste preferences. You can also add sugar and spices to your preference. In this sauce, I used almond extract, cinnamon sticks (I placed them right into the jars before filling), all spice, cloves, and of course, sugar. Don’t be afraid to taste as you go along. The spices that were placed into the applesauce gives more complex flavours than just your regular sweet applesauce. It becomes savory (mainly due to the all spice) and has a natural tartness from the apples- some were a bit green, contributing to the tartness. The color was a nice brown and I mashed and strained it by hand to get a smooth consistency.
Ingredients:
Prep Time: 30 mins Cook Time: 1 1/2 hrs *including canning process
Apples
Cinnamon Sticks/ Ground Cinnamon
Almond Extract
Cloves
All Spice
Granulated Sugar
Water
Lemon Juice
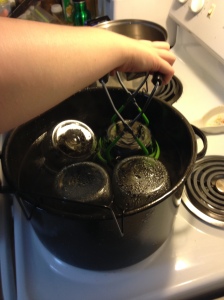
1. Start boiling water in your canner, once boiled, add your jars into the canner. Bernardin says to cover the jars completely in the boiling water, while simplycanning.ca says you don’t need to submerge them in boiling water. I decided to go with Bernardin’s instructions on this because it’s a notable source, and there is very high chance of contamination and botulism when canning. Be sure to keep all surfaces, tools, handling ares clean! Do not solely use this site for canning information- refer to trusted sources before attempting canning. I kept the water boiling and the jars in the water until ready to fill. You must keep your jars hot at all times. Fill a pan with water and your lids and seals; keep those hot at all times as well. I also left them in the hot water and pan until ready to use.

2. Peel, core, and slice your apples; you don’t have to peel them at the beginning, if you have red skins, it’ll give your applesauce and nice pink hue. I peeled them right at the beginning because I wanted to keep it that nice light brown colour. Throw your slices in a bowl with some water and lemon juice to keep them from browning.

3. Next add them to a pan or pot with some water to keep your apples from scorching. Once soft and tender, you can either run your slices through a food mill, or do it by hand. At this stage, the peels, if you have kept them on will start to come off during the milling process. I don’t have an automatic mill, so I did it by hand.

4. Next I boiled my applesauce and added sugar and spices to taste. Now you’re ready to fill your jars.
5. Remove your jars with a jar lifter. You can buy kits that contain all the materials you’ll need to properly can. It is helpful to also have a canning funnel, this should come in a canning kit, too. I added two cinnamon sticks to each jar before filling with my applesauce. Give the appropriate 1/2 inch head space. Remove air bubbles by inserting a bubble remover and running it along the sides of the jar- this should also be included in a kit.
6. Next, lower your jars into the canner of boiling water and ensure that it stays boiling throughout the processing time. Make sure you adjust the time for altitude, charts are provided at both simplycanning.ca and Bernardin. My applesauce only had to process for 20 minutes, because it processes for more than 10 minutes, you do not need to sterilize your jars- both the food and jars will sterilize while processing.

7. Set your jars on either a wooden surface or lay thick towels on your countertop. Keep them separate from one another as they need to cool, and keep undisturbed for 24 hours. Remember to always label and date your jars. Store in a cool, dry, dark place and try to eat them within the year.

Recipe developed by la Nu Chef, 2015
